Using Campaign Manager
Navigate to Campaigns > Campaign Manager to create, view, and manage your saved campaigns.
**Effective November 6th, the open rate detection is no longer available as it is against Amazon's TOS.***
Campaigns use your saved email templates and send them out using specific rules and timing that you choose. Campaign Manager lists all the campaigns you have created. You can edit, clone, delete, or preview the saved campaigns.

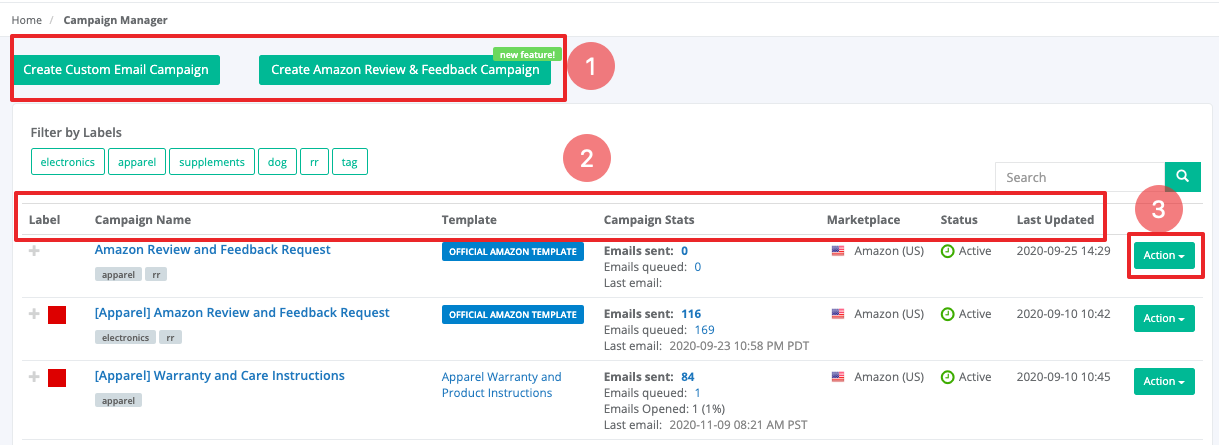
1. Create Custom Email Campaign- Clicking this button will take you to the create campaign page where you can tie in any customized email template.
Create Amazon Review & Feedback Campaign- This campaign will use Amazon's default email template for the review/feedback request. This campaign is just like clicking on the Request Review button in Seller Central, except fully automated.
To better determine which campaign you prefer, refer to this article.
2. This is where Campaign Manager lists all your created Campaigns and provides a quick summary of each Campaign.
Label- Create custom color labels to sort and group campaigns
Campaign Name- Name of the campaign.
Template- Template used for this campaign.
Order Type- Campaign will target FBA, FBM or both types of Amazon orders.
Campaign Timing and Rules- Shows when emails will be sent and to which types of product(s).
Campaign Stats- Shows how many emails are sent total, clicking on the # will display a popup with more in-depth stats for each campaign.
Status- Shows which marketplace the campaign is targeting and if campaign is active or inactive.
3. Actions & Stats
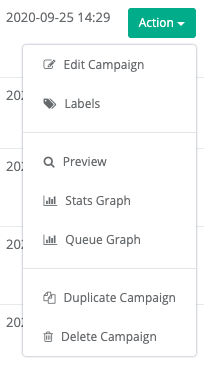
Edit Campaign- Takes you back to the campaign creator page where you can edit the campaign
Labels- Custom label (max 5 per campaign) helps locate campaign quicker
Preview- This will display the current email template that is running inside the campaign and what it will look like when your customers open it.
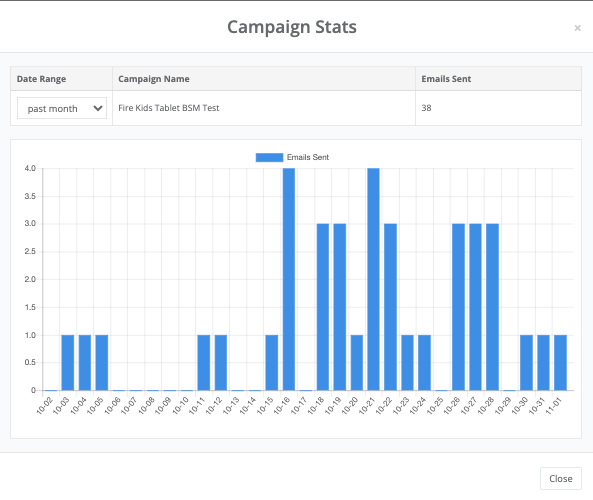
Stats Graph- Pop up will show details on the statistics of the campaign.
Queue Graph- Pop up will display a graph of emails queued and dates emails will send.
Duplicate- This will make an exact copy of the current campaign. The new campaign name will have [Copy] at the end of the name. You can edit the name of the cloned campaign afterwards. This feature is useful when you need to make a similar campaign and make minor changes.
Delete- This will delete the selected campaign. 
1. Date Range- Clicking on the box below will display a drop down menu allowing you to display the campaign statistics in a weekly, monthly, yearly, or all-time time frame.
2. Campaign Name- Name of the campaign.
3. Emails Sent- Shows the number of emails sent based on the date range selected.


