How to Create a Custom Email Campaign
Navigate to Campaigns > Campaign Manager
Click ![]()

Campaigns use your saved email templates and apply rules and timings to send out those email templates. You can create and edit existing campaigns. When you have finished, click Save.
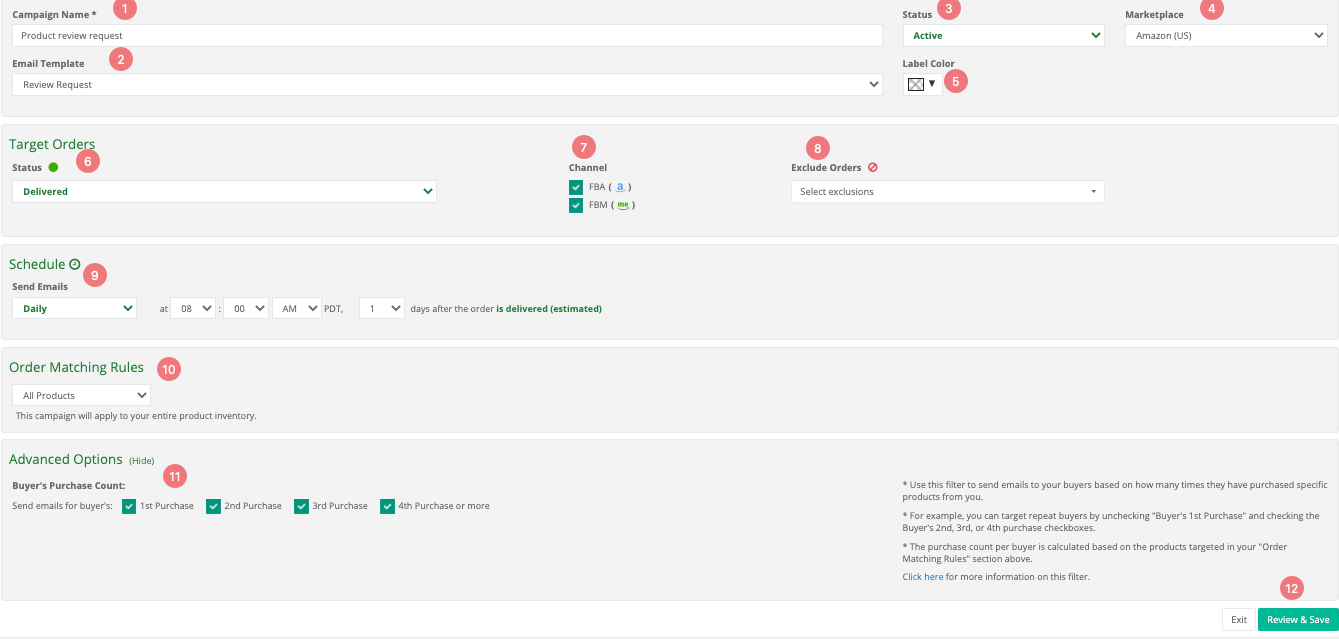
1. Campaign Name- Create a name for your campaign.
2. Email Template- Click the carrot button to enable a drop down listing showing your created email templates. This will set the template your campaign will use. Click here to learn how to create email templates.
3. Status- Set the current state of the campaign. Active means the campaign is running. Inactive means the campaign is suspended and will not send any emails. When a campaign is set to "inactive" state, all the emails that were previously queued in the "active" state of the current campaign will be removed.
4. Marketplace- Choose which marketplace this campaign will target.
5. Label Color- Choose a color for the campaign, when you view the campaign manager you can group together colors to make it easier to organize when you have multiple campaigns running at once.
6. Status- Click the carrot button to choose which event status type you want to target.
Shipped- When an order is marked as shipped
Delivered- When an order is marked as delivered
Returned- When an order is returned
Unshipped- FBM orders have an unshipped state(FBA does not)
With Feedback- Whenever a feedback is left(choose rating)
With Promotion- Any order that has either or item or shipping promotion
Repeat Buyer- Any customer who have purchased more than 1 order from your storefront
7. Channel- Checking the boxes lets you target exclusively FBA or FBM orders. If both boxes are checked, it will target both FBA and FBM orders.
8. Exclude Orders with:- These options allow you to further filter which orders you want to exclude. Checking the box next to each name will enable the filter.
Returns- Orders that have been returned/refunded(FBA only)
Promotions- Orders that have either a shipping or item promotion
Delayed Shipments (FBM only)- Orders where the item was shipped late
Negative Feedback - 1 or 2 star feedback received
Neutral Feedback- 3 star feedback received
Positive Feedback- 4 or 5 star feedback received
9. Send Emails- Choose a time when you want emails to go out
As Soon as possible- Emails will fire out in a window between 15-25 minutes after an order enters the status chosen previous in 5.
Daily- Choose a daily time, and how many days after an order enters the status chosen previous in 6.
10. Order Matching Rules- This is where you choose which products in your inventory you want to target. Clicking carrot button will expand a drop down menu with different options. The empty box below is where you enter the data based on the selected matching order rule.
Sku Contains- You can enter SKU's that contain the same search strings. Minimum is 3 characters. For example if you had SKUs named: Bike_red, Bike_blue, Bike_orange, you can type "Bike" and it will apply for all 3 SKUs.
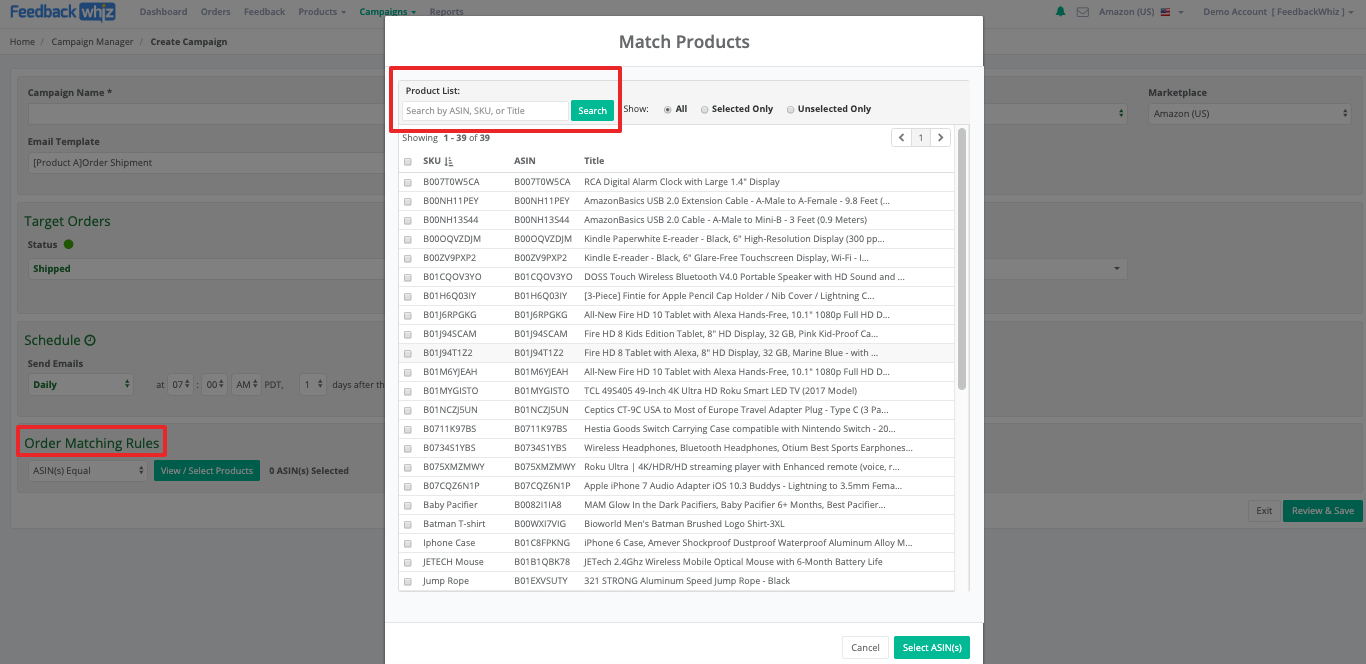
Sku(s) Equal- You can enter the exact SKU you want to target. You can choose as many SKUs as you like by selecting the "View/Select Products" option and it will display the list like below to easily choose all Sku's.
Sku(s) Exclude- You can exclude certain SKUs. Type in any SKU and it will list the names. You can choose as many SKUs as you like to exclude. Your campaign will then target all remaining SKUs and exclude the ones you have chosen here.
Asin(s) Equal- You can enter the exact ASIN you want to target. You can choose as many ASIN's as you like by selecting the "View/Select Products" option and it will display the list like below to easily choose all ASIN's.
Product Name Contains- You can enter the name of a product with a minimum of 3 characters, and it will include all products sharing that string. Refer to "SKU Contains" for example.
All Products- This is include every single product in your inventory


11. Advanced Options- Buyer's Purchase Count- Targeting Buyer's Purchase Count feature allows you to send unique email messages to your buyers based on their purchase count. 
Refer to Buyer's Purchase count
12. Review & Save / Exit-
Exit- Exits the campaign editor
Review and Save- Brings up a window to show:
Would you like to apply these updated settings to the orders currently in the email queue from the previous settings?
Anytime a campaign is updated, this option will allow users to transfer the changed settings to the same orders that were previously targeted in the queue system
Select from the drop down box below to also send emails from this campaign to past orders:
Choose to also target past orders that meet the chosen conditions of the campaign anywhere from up to 30 days. Note: If “include past orders” is selected, any order(s) that had emails previously sent using this campaign will not enter the email queue. This is to prevent sending duplicate emails to your past orders.


