This article provides an overview of the View Results table in the Basic View. After reading this article, you'll know how to:
- Use row toolbars to save and delete data
- Use the Amazon toolbar to find product price and sales history
- Analyse profit potential by looking at key financial figures
- Assess a product's potential by looking at non-financial data
To learn more about Advanced View, take a look at our article Analyze View Results: Advanced View.
These View Results instructions can be used to learn analytic skills for the following search portals:
- Product Search (basic)
- Reverse Search (basic)
- Wholesale Search (basic)
This article skips over background information that was covered elsewhere. For those sorts of details, see:
Using the Row Toolbar
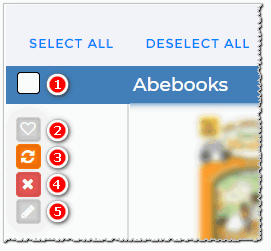
The toolbar on the left side of each row in the View Results table offers five key tools:
- Select and Deselect
- Save
- Update Data
- Mark as Mismatch
- Add Note
For a detailed guide on using each tool, visit the View Results Row Toolbar article to learn more.
Using the Amazon Toolbar
This toolbar is inside the Amazon cell.
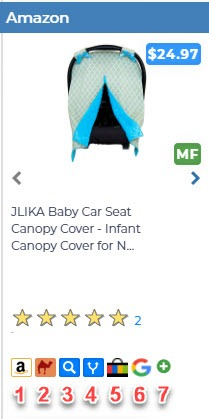
The Amazon Toolbar has 7 tools:
1. Amazon Seller Central
Use this button to confirm you're able to sell this product on Amazon. Occasionally, there are product restrictions. Before making a buy decision, it's a good idea to see if there are any restrictions.
- Open a new tab on your browser and then login to your Amazon Seller Central account.
- Come back to the Tactical Arbitrage tab.
- Click the Amazon Seller Central button. A new Amazon tab displays.
- If Amazon's Add a Product page displays the product name and a Sell Yours button, there are no product restrictions.
2. Opening Camel Camel Camel
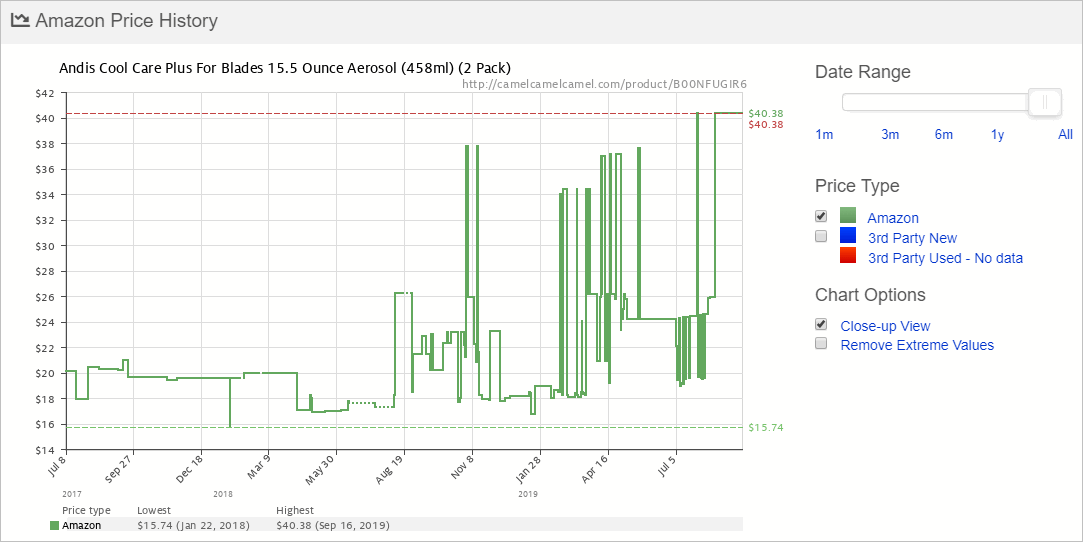
Click this button to open a Camel Camel Camel graph. It's a handy-dandy tool to track Amazon prices.
3. Opening Search Amazon Title
Click this button to search the product title on Amazon. This is a useful tool when you have a product that does not have an exact match. You can do a quick Amazon inspection. Sometimes, you can find another product which is a perfect match.
4. Opening Source Page and Amazon Page
This button is to open the source product page as well as the Amazon product detail page.
5. Checking Completed and Sold Listings on eBay
Click this button to search for the Amazon UPC on eBay and view both completed and sold listings.
6. Checking Completed and Sold Listings on Google Shopping
Click this button to search for the Amazon UPC on Google Shopping.
7. Adding a Custom Link
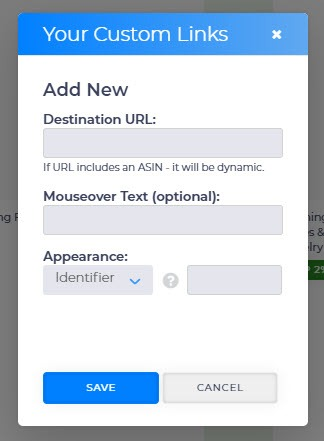
Use this button to open the Your Custom Links popup, allowing you to add links to any third-party site. Here’s how to configure your custom link:
- Destination URL: Enter the URL you’d like to access here. If the URL contains an ASIN, it will dynamically reference the specific product in the row you’re viewing, such as linking directly to that ASIN’s Amazon offers page.
- Mouseover Text: (Optional) Enter brief text to appear when hovering over the button, providing a quick reminder of its purpose.
- Appearance Settings:
- Identifier: Add a 1- or 2-character alphanumeric code to easily recognize what the link is for.
- Logo: Upload a JPG or PNG logo, with a minimum size of 20 x 20 pixels and a file size under 2MB.
- Logo URL: Enter a URL if you’d like to use an externally hosted logo.
Analysing Financial Data
The View Results table presents financial estimates for each product. These figures are an important part of your overall buy decision, but there are other factors to consider, like sales context.
To simplify that analysis, you'll find key data in a single table cell called Details. The key data points are:
- Gross Profit
- Gross ROI
- Monthly Sales
- Number of Sellers
Here’s some example to help you understand this functionality:
Example 1
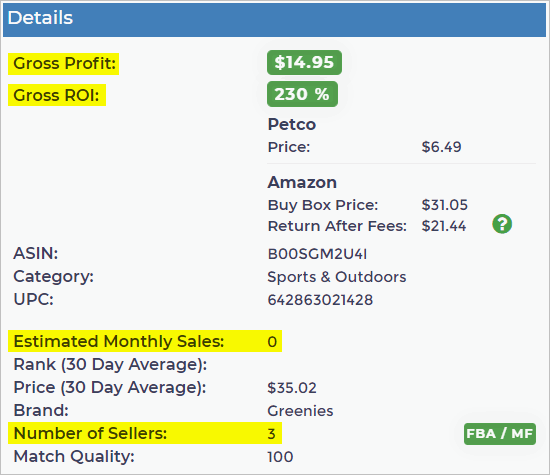
An example of a product that seems to offer a good profit potential but a poor sales context.
- The financials look strong: gross profit per sale is about $15 and the gross ROI is 230%
- The context is not appealing. Monthly sales are estimated to be 0 and there are 3 sellers.
Example 2
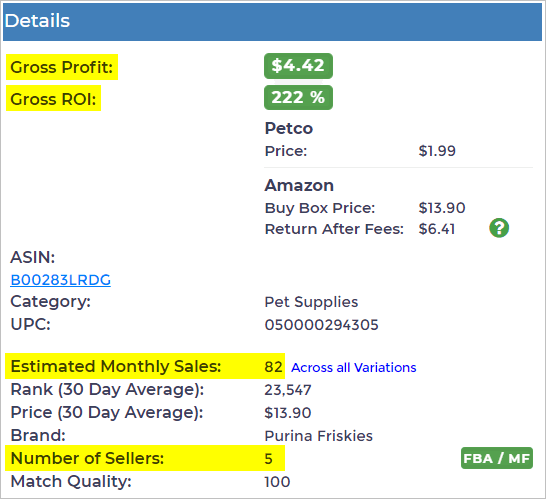
An example of a high volume product with a modest profit margin.
- The gross ROI is strong but the gross profit per sale is $4.41.
- The context looks strong. There are only 5 sellers yet the product sells an estimated 82 units per month.
Now, would you buy these products?
Before making a buy decision, you should look at non-financial data and consider your own arbitrage strategy.
Comparing Non-Financial Data
Analyzing the View Results table can feel overwhelming, with so many details to review. Data analysis is both a science and an art, and there’s no single path to follow.
To make this easier, we’ve created a quick checklist of four key non-financial factors to consider when making a buying decision.
These steps are essential for confirming that the buy and sell products are identical. Accurate product matching helps prevent customer complaints, returns, and negative reviews in the long run.
Checking Codes
Checking product codes is always a essential first step when considering a potential buy.
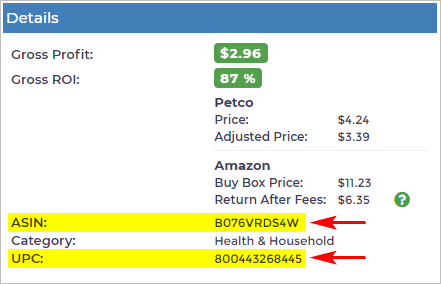
Start by locating the Details box and reviewing the ASIN and UPC lines. If the numbers align, the codes match. The image below demonstrates what matching codes look like.
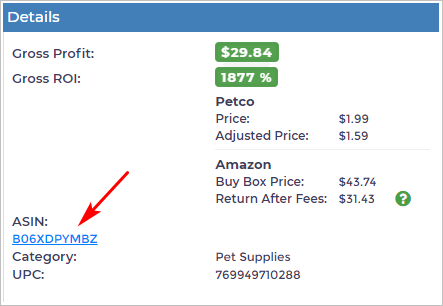
Code mismatches appear in the Details box as an ASIN with a hyperlink. Click the hyperlink to review the product options. You might find a matching product.
If the codes do not match, you might want to avoid this product.
Checking Images
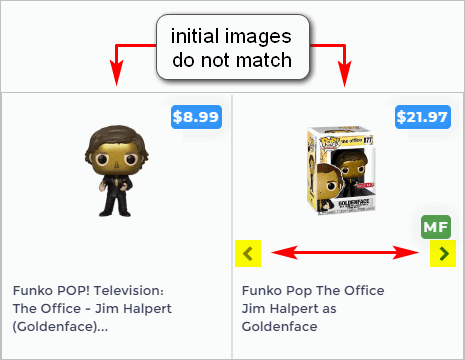
Comparing images is another way to see if the source product is the same as the Amazon product.
In some cases, the initial images don't match. If the Amazon site has additional images, two arrows display.
Start by clicking the arrows to change the image display.
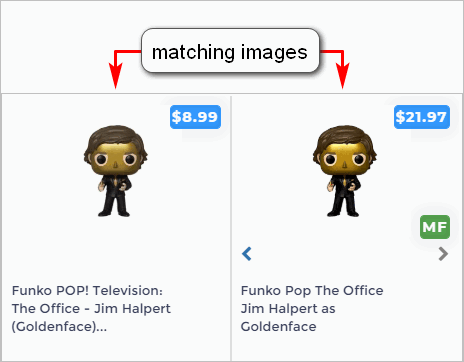
In this example, we clicked the arrows and found a matching image. This is another layer of proof that product quality is the same.
Checking Quantities
You’ve found a match with a fantastic ROI, and the excitement kicks in, but are you really comparing apples to apples?
Check the quantities. Sometimes the titles match, but the quantities differ.
Take this example, the image below shows an enticing gross ROI of 255%. However, the quantities don’t align.
- The source product is a single bag.
- The Amazon listing is for a two-pack.
Click the link to verify the Amazon product details. In this case, it’s indeed the same item, but the quantity difference is crucial to note.
Checking Product Ratings
You can form an opinion about product quality by looking at Amazon customer ratings and the number of customer reviews.
Ratings and reviews are not displayed in Basic View. However, they are easy to find.
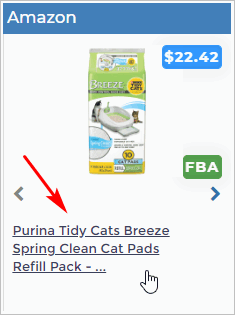
- Go to the Amazon cell.
- Click the product title and the Amazon product page displays in a new tab.
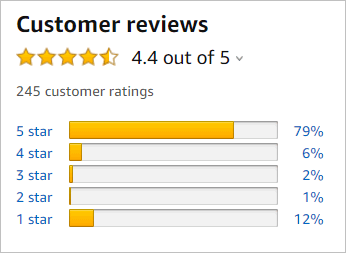
Scroll down the Amazon product page. You can see the product rating and the number of customer reviews.
We recommend avoiding products with a rating of 3 or less. That rating level suggests customers don't love the product or the item fails to deliver as expected. Avoiding troublesome products makes good business sense. You avoid returns and possible negative reviews about your business.
The number of reviews gives you an idea about trends. If hundreds or thousands of people award a 4+ start rating, it's likely the product delivers quality to the customer.
Creating Buy Strategy
New players in the arbitrage game might want to make strategic buy decisions to manage risk.
There are two basic buying strategies: go wide or go deep.
- Go wide means you buy many different kinds of items but only one or two of each.
- Go deep means you buy a large quantity of a few items. This strategy is recommended for items which have a high sales rank and highly monthly sales volume.
The best choice for you depends on several factors including experience, your business aims, working capital, and risk tolerance.
What’s Next?
Already mastered Basic View and are ready to level up? Explore the articles below to learn all about Advanced View in View Results:


